public static String makeNumberComma(String str) {
String number = String.valueOf(str);
int amount = Integer.parseInt(number);
DecimalFormat formatter = new DecimalFormat("#,###");
String formatted = formatter.format(amount);

return formatted;
}


'android' 카테고리의 다른 글

마테리얼 디자인 정리가 잘되어있어 올립니다.  (0) 2017.12.02
LTE, WIFI, Network 체크  (0) 2017.12.02
문자열 전화번호 포맷  (0) 2017.12.02
Custom ProgressDialog  (0) 2017.12.02
안드로이드 실행 지연  (0) 2017.12.02
public static String makePhoneNumber(String phoneNumber) {
String regEx = "(\\d{3})(\\d{3,4})(\\d{4})";

if (phoneNumber == null) {
phoneNumber = "";
}

if(!Pattern.matches(regEx, phoneNumber)) {
return phoneNumber;
}

return phoneNumber.replaceAll(regEx, "$1-$2-$3");
}


'android' 카테고리의 다른 글

LTE, WIFI, Network 체크  (0) 2017.12.02
문자열 숫자 콤마 붙이기  (0) 2017.12.02
Custom ProgressDialog  (0) 2017.12.02
안드로이드 실행 지연  (0) 2017.12.02
웹 뷰 테스트  (0) 2017.11.29

//custom progress dialog
public static class JKProgressDialog extends Dialog {
public static Context mContext;
AppCompatActivity mActivity;
public JKProgressDialog(final Context mContext, final AppCompatActivity mActivity) {

super(mContext, R.style.JkDialog);

this.mContext = mContext;
this.mActivity = mActivity;

WindowManager.LayoutParams wlmp = getWindow().getAttributes();
wlmp.gravity = Gravity.CENTER_HORIZONTAL;
getWindow().setAttributes(wlmp);
setTitle(null);
setCancelable(true);

LinearLayout layout = new LinearLayout(mContext);
layout.setOrientation(LinearLayout.VERTICAL);
LinearLayout.LayoutParams params = new LinearLayout.LayoutParams(LinearLayout.LayoutParams.MATCH_PARENT, LinearLayout.LayoutParams.WRAP_CONTENT);
ProgressBar dialog = new ProgressBar(mContext);

//프로그래스 색상 변경
PorterDuffColorFilter commColor = new PorterDuffColorFilter(mContext.getResources().getColor(R.color.black), PorterDuff.Mode.SRC_ATOP);
dialog.getIndeterminateDrawable().setColorFilter(commColor);

layout.addView(dialog, params);
addContentView(layout, params);
}

@Override
public void show() {
try{
super.show();
} catch (Exception e){
e.printStackTrace();
}

}

@Override
public void dismiss(){
try{
super.dismiss();
} catch (Exception e){
e.printStackTrace();
}
}
}


'android' 카테고리의 다른 글

문자열 숫자 콤마 붙이기  (0) 2017.12.02
문자열 전화번호 포맷  (0) 2017.12.02
안드로이드 실행 지연  (0) 2017.12.02
웹 뷰 테스트  (0) 2017.11.29
CallBack만들기  (0) 2017.11.29

new Handler().postDelayed(new Runnable() {
@Override
public void run() {
// 수행할 내용 입력
}
}
, 2000); // 2초 뒤에 수행할 내용에 입력된게 실행됨, 시간은 사용자에 맞게 변경하면됨

시간은 1000 = 1초


'android' 카테고리의 다른 글

문자열 전화번호 포맷  (0) 2017.12.02
Custom ProgressDialog  (0) 2017.12.02
웹 뷰 테스트  (0) 2017.11.29
CallBack만들기  (0) 2017.11.29
TextView Ellipsis 상태인지 아닌지 확인하는 방법  (0) 2017.11.27

chrome://inspect/#devices 


WebView.setWebContentsDebuggingEnabled(true);

'android' 카테고리의 다른 글

Custom ProgressDialog  (0) 2017.12.02
안드로이드 실행 지연  (0) 2017.12.02
CallBack만들기  (0) 2017.11.29
TextView Ellipsis 상태인지 아닌지 확인하는 방법  (0) 2017.11.27
appbarlayout 스크롤 Enable, disable  (0) 2017.11.22

인터페이스를 만들어 준다

public interface RsltImpl {
public void callBack(String result);
public void start();
public void stop();
}

public class CallBackM implements Runnable {

private Context mContext;
private RsltImpl rslt;

public MsgRead(Context mContext, RsltImpl) {
this.mContext = mContext;
this.rslt = rslt;

}

@Override
public void run() {
this.rslt.start();
this.rslt.callBack(result);
this.rslt.stop();
}
}

RsltImpl rslt = new RsltImpl() {
@Override
public void callBack(String result) {
Log.e("CallBack", "CallBack");

// 콜을 받아서 UI 작업이 있을때는 runOnUiThread를 사용해야한다!

}

@Override
public void start() {
Log.e("START", "START");
}

@Override
public void stop() {
Log.e("STOP", "STOP");
}
};

CallBackM callBackM = new MsgRead(mContext, rslt);
//이렇게 하면 동기화로 돌아감
//callBackM.run();

Thread thread = new Thread(callBackM);
thread.start();

입맛대로 쓰면됨....

recyclerView Adapter 안에서


holder.textView.onPredraw()로 뷰가 다 그려졌는지 확인 후 holder.textViewr.getLayout()이 null이 아닌 상태에서만 가능


holder.textView.getViewTreeObserver().addOnPreDrawListener(new ViewTreeObserver.OnPreDrawListener() {

  @Override

  public boolean onPreDraw() {

    int ellipseCount = holder.textView.getLayout().getEllipsisCount(holder.textView.getLayout().getLineCount()-1);

    if (ellipseCount > 0) {

      // Ellipsis 상태이면 0 이상이 나옴

    }

    holder.textView.getViewTreeObserver().removeOnPreDrawListener(this);

    return true;

  }

});


activity 안에서

public boolean isEllipsis(TextView textView) {

    // Ellipsis 상태이면 0 이상이 나옴

    if (textView.getLayout() != null) {

        return textView.getLayout().getEllipsisCount(textView.getLineCount()-1) > 0;

    }

    return false;

}


holder.textView.getLayout() 또는 textView.getLayout() 가 null이면 안됨!!!!!


'android' 카테고리의 다른 글

웹 뷰 테스트  (0) 2017.11.29
CallBack만들기  (0) 2017.11.29
appbarlayout 스크롤 Enable, disable  (0) 2017.11.22
recyclerview scroll 정보 가져오기  (0) 2017.11.22
shape 백그라운드 컬러 다이나믹하게 적용하기  (0) 2017.11.14

AppBarLayout 안에 LinearLayout의 빨간색으로 옵션을 지정하면 해당 영역 만큼 스와이프로 숨길 수 있음


<android.support.design.widget.AppBarLayout

    android:id="@+id/appBarLayout"

    android:layout_width="match_parent"

    android:layout_height="wrap_content"

    app:elevation="0dp">


    <LinearLayout

        android:id="@+id/layout"

        android:layout_width="match_parent"

        android:layout_height="wrap_content"

        android:layout_marginBottom="10dp"

        android:layout_marginLeft="10dp"

        android:layout_marginRight="10dp"

        android:layout_marginTop="10dp"

        android:background="@drawable/search_drawable"

        app:layout_scrollFlags="scroll|enterAlways">


</android.support.design.widget.AppBarLayout>


코드에서 제어하기 위해서는


AppBarLayout appBarLayout = (AppBarLayout) findViewById(R.id. appBarLayout);

LinearLayout layout = (LinearLayout) findViewById(R.id. layout);

AppBarLayout.LayoutParams params = (AppBarLayout.LayoutParams) layout.getLayoutParams();


선언 후 appBarLayout을 찾아온 후

params.setScrollFlags(0)을하면 스크롤을 해도 숨겨지지 않는다 반대로

params.setScrollFlags(1)로 적용하면 원래의 기능을 사용할수 있음
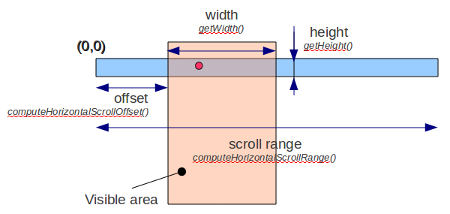
intcomputeHorizontalScrollExtent()

Compute the horizontal extent of the horizontal scrollbar's thumb within the horizontal range.

intcomputeHorizontalScrollOffset()

Compute the horizontal offset of the horizontal scrollbar's thumb within the horizontal range.

intcomputeHorizontalScrollRange()

Compute the horizontal range that the horizontal scrollbar represents.

intcomputeVerticalScrollExtent()

Compute the vertical extent of the vertical scrollbar's thumb within the vertical range.

intcomputeVerticalScrollOffset()

Compute the vertical offset of the vertical scrollbar's thumb within the vertical range.

intcomputeVerticalScrollRange()

Compute the vertical range that the vertical scrollbar represents.


* Extend : 한 화면에 보여지는 View 의 크기(width || height) 

  - 아래 이미지에서 주황색 영역

* Offset : Scroll된 거리 -> -1을 곱하면 해당 뷰의 위치(x || y, top || left) 가 된다.

   --> staggered  grid layout 일 경우 값이 튀는(?) 경우들이 발생한다.

   --> 리스트가 scroll 될 때마다 child 의 위치가 변경되는 경우들이 발생하기 때문에 range 도 바뀌고 offset 들이 바뀌는 경우 들이 있기 때문이다.

* Range : Scroll 가능한 View 의 전체 크기 -> RecyclerView 의 크기( width || height )

   --> staggered grid layout 일 경우 스크롤링 하면 상황에 따라 계속 변경 됨


** 화면을 끝으로 이동하였을 때 offset + extend = range 가 된다.


- 참고 이미지 : HorizontalScrollView 에서의 각 수치들 설명 이미지 (http://android.keicode.com/basics/ui-custom-horizontalscrollview.php)

- 파란색 : 스크롤 가능한 View 전체

- 주황색 : 눈에 보여지는 View 의 영역

HorizontalScrollView


출처: http://ymson.tistory.com/entry/RecyclerView-의-Scroll-정보-얻기 [YeonMee's Tistory]

http://www.fontsaddict.com/

'기타' 카테고리의 다른 글

유니코드 변환  (0) 2020.08.05
쿼리 정리 사이트  (0) 2018.01.31
codebeautify  (0) 2017.12.02
맥 터미널 개발환경 구축하기  (0) 2017.12.02
나인패치 이미지 사이트  (0) 2017.12.02

+ Recent posts