intcomputeHorizontalScrollExtent()

Compute the horizontal extent of the horizontal scrollbar's thumb within the horizontal range.

intcomputeHorizontalScrollOffset()

Compute the horizontal offset of the horizontal scrollbar's thumb within the horizontal range.

intcomputeHorizontalScrollRange()

Compute the horizontal range that the horizontal scrollbar represents.

intcomputeVerticalScrollExtent()

Compute the vertical extent of the vertical scrollbar's thumb within the vertical range.

intcomputeVerticalScrollOffset()

Compute the vertical offset of the vertical scrollbar's thumb within the vertical range.

intcomputeVerticalScrollRange()

Compute the vertical range that the vertical scrollbar represents.


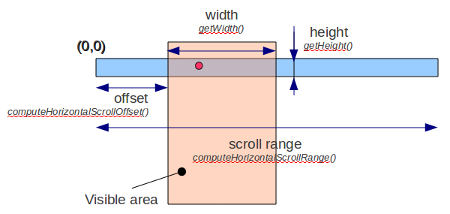
* Extend : 한 화면에 보여지는 View 의 크기(width || height) 

  - 아래 이미지에서 주황색 영역

* Offset : Scroll된 거리 -> -1을 곱하면 해당 뷰의 위치(x || y, top || left) 가 된다.

   --> staggered  grid layout 일 경우 값이 튀는(?) 경우들이 발생한다.

   --> 리스트가 scroll 될 때마다 child 의 위치가 변경되는 경우들이 발생하기 때문에 range 도 바뀌고 offset 들이 바뀌는 경우 들이 있기 때문이다.

* Range : Scroll 가능한 View 의 전체 크기 -> RecyclerView 의 크기( width || height )

   --> staggered grid layout 일 경우 스크롤링 하면 상황에 따라 계속 변경 됨


** 화면을 끝으로 이동하였을 때 offset + extend = range 가 된다.


- 참고 이미지 : HorizontalScrollView 에서의 각 수치들 설명 이미지 (http://android.keicode.com/basics/ui-custom-horizontalscrollview.php)

- 파란색 : 스크롤 가능한 View 전체

- 주황색 : 눈에 보여지는 View 의 영역

HorizontalScrollView


출처: http://ymson.tistory.com/entry/RecyclerView-의-Scroll-정보-얻기 [YeonMee's Tistory]

Shape를 만든 후

<?xml version="1.0" encoding="UTF-8"?>

<shape xmlns:android="http://schemas.android.com/apk/res/android"

       android:shape="rectangle">

    <solid android:color="@color/buttonColor"/>

    <stroke

        android:width="1dp"

        android:color="@color/transparent" />

    <corners

        android:bottomRightRadius="5dp"

        android:bottomLeftRadius="5dp"

        android:topLeftRadius="5dp"

        android:topRightRadius="5dp"/>

    <padding

        android:left="1dp"

        android:top="1dp"

        android:right="1dp"

        android:bottom="1dp" />

</shape>


적용하고자하는 레이아웃에 백그라운드로 적용

<Button

    android:id="@+id/btn"

    app:backgroundTint="@null"

    android:layout_width="match_parent"

    android:layout_height="match_parent"

    android:layout_marginTop="5dp"

    android:background="@drawable/your_shape"

    android:gravity="center"

    android:text="@string/login"

    android:textColor="@color/white"

    android:textSize="14sp"

    android:textStyle="bold"/>


적용한 액티비티에 아래 코드로 Shape에 색상을 변경하면됨

GradientDrawable bgShape = (GradientDrawable) btn.getBackground();

bgShape.setColor(Color.BLACK);


Drawable bgShape = DrawableCompat.wrap(btn.getbackground()).mutate();

DrawableCompat.setTint(bgShape, ContextCompat.getColor(mContext, R.color.yourColor));


'android' 카테고리의 다른 글

appbarlayout 스크롤 Enable, disable  (0) 2017.11.22
recyclerview scroll 정보 가져오기  (0) 2017.11.22
문자, 전화 intent  (0) 2017.11.13
리스트뷰, 스크롤뷰 리플 이펙트 제거  (0) 2017.11.07
이미지뷰 라운드 처리  (0) 2017.10.30

문자 화면

Intent intent = new Intent(Intent.ACTION_VIEW);
intent.setData( Uri.parse("sms:" + "01000000000"));
startActivity(intent);


전화 걸기

Intent intent = new Intent(Intent.ACTION_DIAL, Uri.parse("tel:" + userPhone));

startActivity(intent);


1. xml에 적용

<android.support.v7.widget.RecyclerView

    android:id="@+id/recyclerView"

    android:layout_width="match_parent"

    android:layout_height="match_parent"

    android:overScrollMode="never" />


2. style.xml에 적용시 추가

<item name="android:overScrollMode">never</item>


3. 코드에 적용시

ListView.setOverscrollHeader(drawable); // 상단

ListView.setOverscrollFooter(drawable);  // 하단


'android' 카테고리의 다른 글

shape 백그라운드 컬러 다이나믹하게 적용하기  (0) 2017.11.14
문자, 전화 intent  (0) 2017.11.13
이미지뷰 라운드 처리  (0) 2017.10.30
투명 액티비티 만들기  (0) 2017.10.27
EditText Style 옵션  (0) 2017.10.11

1. 끝에만 라운딩하는 방법

<?xml version="1.0" encoding="utf-8"?>

<shape xmlns:android="http://schemas.android.com/apk/res/android"

android:shape="rectangle">

<corners android:radius="8dp"/>

</shape>

radius를 원하는 만큼 지정해 모서리를 둥글게 만들면고 

아래 코드로 지정해주면 됨

ImageView imageView = (ImageView) findViewById(R.id.image_view);

GradientDrawable drawable=

    (GradientDrawable) context.getDrawable(R.drawable.background_rounding);

imageView.setBackground(drawable);
imageView.setClipToOutline(true);

2. 완전 동그렇게 만드는 방법

위의 코드 처럼 xml을 만들 필요 없이 원하는 이미지뷰 아래코드를 적용해주면 끝

imageView.setBackground(new ShapeDrawable(new OvalShape()));
imageView.setClipToOutline(true);


'android' 카테고리의 다른 글

문자, 전화 intent  (0) 2017.11.13
리스트뷰, 스크롤뷰 리플 이펙트 제거  (0) 2017.11.07
투명 액티비티 만들기  (0) 2017.10.27
EditText Style 옵션  (0) 2017.10.11
커스텀 텍스트 뷰  (0) 2017.10.10

style.xml에 스타일 추가


<style name="Theme.Transparent" parent="android:Theme">

    <item name="android:windowBackground">@android:color/transparent</item>

    <item name="android:colorBackgroundCacheHint">@null</item>

    <item name="android:windowIsTranslucent">true</item>

    <item name="android:windowAnimationStyle">@android:style/Animation</item>

    <item name="android:windowNoTitle">true</item>

    <item name="android:windowContentOverlay">@null</item>

    <item name="android:backgroundDimEnabled">true</item>

    <item name="android:windowFullscreen">true</item>

</style>


android:backgroundDimEnabled

true - 반투명 검정 /  false - 완전 투명 


manifests > AndroidManifest.xml


<activity android:name=".MainActivity"

    android:theme="@style/Theme.Transparent"></activity>

-> 원하는 activity 의 theme를 위에서 정의한 style로


form_main.xml


<LinearLayout xmlns:android="http://schemas.android.com/apk/res/android"

    android:orientation="vertical"

    android:layout_width="fill_parent"

    android:layout_height="fill_parent"

    android:background="@android:color/transparent">

</LinearLayout>

투명창으로 보이게할 Layout의 배경 background를 transparent 로 지정


추가 내용
https://m.blog.naver.com/artisan_ryu/220663792572


'android' 카테고리의 다른 글

리스트뷰, 스크롤뷰 리플 이펙트 제거  (0) 2017.11.07
이미지뷰 라운드 처리  (0) 2017.10.30
EditText Style 옵션  (0) 2017.10.11
커스텀 텍스트 뷰  (0) 2017.10.10
actionbar 공통으로 사용하기  (0) 2017.10.10

<EditText

android:id="@+id/et"

android:layout_width="match_parent"

android:layout_height="match_parent"

android:background="@null"  밑줄 제거

/>


colorControlActivated       : 손끝으로 터치되어 있는 부분. text selection handle라고 부른다고 한다

colorControlNormal         : 포커스 되어있지 않은 경우의 밑줄 부분

colorControlActivated       : 포커스시의 밑줄 부분. Tint 되어있어 지정한 색보다 약간 투명이 적용되어있고, 길게 누르면 지정한 색이된다.

android:textColorHighlight : 텍스트 선택색

android:textColorHint        : 입력전의 Hint (포커스 Holder)

android:textColor             : 텍스트 색

android:textCursorDrawable : 커서 색. drawable 지정되지만, 색을 설정하는것도 된다


// styles.xml

<style name="EditTextStyle" parent="Widget.AppCompat.EditText">

    <item name="colorControlNormal">@color/amber500</item>

    <item name="colorControlActivated">@color/pink500</item>

    <item name="android:textCursorDrawable">@color/indigo500</item>

    <item name="android:textColor">@color/orange500</item>

    <item name="android:textColorHint">@color/teal500</item>

    <item name="android:textColorHighlight">@color/purple500</item>

</style>

'android' 카테고리의 다른 글

이미지뷰 라운드 처리  (0) 2017.10.30
투명 액티비티 만들기  (0) 2017.10.27
커스텀 텍스트 뷰  (0) 2017.10.10
actionbar 공통으로 사용하기  (0) 2017.10.10
화면 가로, 세로 고정  (0) 2017.10.10

style.xml의 커스텀 textView 만들기


<style name="CustomTextView"  parent="@android:style/Widget.TextView">

    <item name="android:layout_width">match_parent</item>

    <item name="android:layout_height">wrap_content</item>

    <item name="android:layout_marginLeft">5dp</item>

    <item name="android:layout_marginRight">10dp</item>

    <item name="android:layout_marginBottom">15dp</item>

    <item name="android:paddingRight">3dp</item>

    <item name="android:paddingLeft">8dp</item>

    <item name="android:textColor">@color/white</item>

    <item name="android:background">@color/custom_main</item>

</style>


위 코드에 원하는 설정 값을 설정한 후


<?xml version="1.0" encoding="utf-8"?>

<LinearLayout xmlns:android="http://schemas.android.com/apk/res/android"

    android:orientation="vertical" android:layout_width="match_parent"

    android:layout_height="match_parent">


    <TextView

        style="@style/CustomTextView"


        />


    <TextView

        style="@style/CustomTextView"

        />


    <TextView

        style="@style/CustomTextView"


        />

    .

    .

    .


</LinearLayout>


출처: http://gun0912.tistory.com/37 [박상권의 삽질블로그]

'android' 카테고리의 다른 글

투명 액티비티 만들기  (0) 2017.10.27
EditText Style 옵션  (0) 2017.10.11
actionbar 공통으로 사용하기  (0) 2017.10.10
화면 가로, 세로 고정  (0) 2017.10.10
안드로이드 파일경로, 파일명, uri 아이디 찾기  (0) 2017.06.02

공통으로 사용할 toolbar layout을 만든 후

해당 레이아웃에 inflater할 영역을 설정하고


아래코드로 구현해준다


LayoutInflater inflater = (LayoutInflater) this.getSystemService(Context.LAYOUT_INFLATER_SERVICE);

RelativeLayout actionBarLayout = (RelativeLayout) findViewById(R.id.actionBar);

inflater.inflate(R.layout.actionbar, actionBarLayout, true);

'android' 카테고리의 다른 글

EditText Style 옵션  (0) 2017.10.11
커스텀 텍스트 뷰  (0) 2017.10.10
화면 가로, 세로 고정  (0) 2017.10.10
안드로이드 파일경로, 파일명, uri 아이디 찾기  (0) 2017.06.02
AsyncTask httpConnection  (0) 2016.12.27

AndroidManifest.xml의 해당 액티비티에 추가해준다


세로 고정

android:screenOrientation="portrait"


가로 고정

android:screenOrientation="landscape"


+ Recent posts